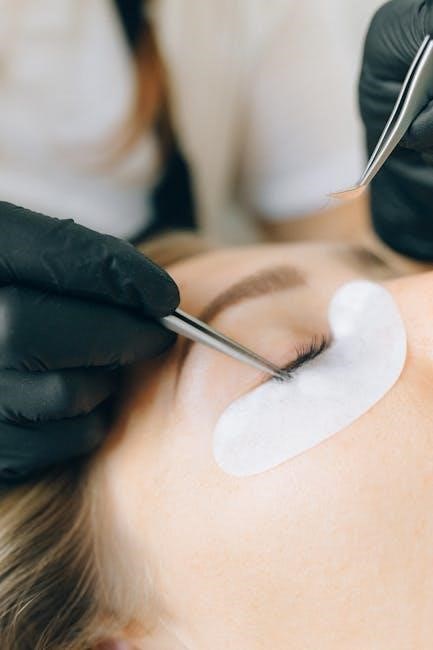
Lash mapping is a crucial technique for applying extensions, enhancing eye shape with precision and definition․ It’s about strategically planning lash placement․
Understanding lash mapping guides allows technicians to create customized looks, from subtle enhancements to dramatic transformations, catering to individual client preferences․
Proper mapping ensures a balanced, aesthetically pleasing result, maximizing the impact of the extensions and providing a natural, lifted appearance for each client․
What is Lash Mapping?
Lash mapping is the foundational process of planning the application of eyelash extensions, acting as a blueprint for a beautiful and customized lash set․ It involves meticulously determining the length, curl, and placement of each extension to complement the client’s unique eye shape and desired aesthetic․
Essentially, it’s about visualizing the final look before any extensions are applied․ Technicians use lash mapping guides – often templates or diagrams – to mark where each lash length will be placed along the lash line․ This ensures symmetry, balance, and a harmonious result․
The process isn’t simply about randomly adhering lashes; it’s a thoughtful design․ Mapping considers the natural lash growth pattern, eye shape (round, almond, hooded, etc․), and the client’s preferences for styles like cat-eye, doll-eye, or a more natural look․ A well-executed map prevents issues like sparse areas, uneven fullness, or a look that doesn’t flatter the eyes․
It’s a critical skill for any lash artist aiming to deliver consistently stunning and satisfying results․
Why is Lash Mapping Important?
Lash mapping is paramount for achieving optimal results and client satisfaction in eyelash extension applications․ Without a precise map, technicians risk creating unbalanced, unflattering, or even uncomfortable lash sets․
Utilizing lash mapping guides ensures a symmetrical and aesthetically pleasing outcome, tailored to the individual’s eye shape․ It prevents common issues like lashes that are too long, too short, or incorrectly angled, which can detract from the natural beauty of the eyes․
Furthermore, mapping contributes to the health of the natural lashes․ By strategically distributing the weight of the extensions, it minimizes stress on the natural lash, promoting longevity and preventing premature shedding․ A well-planned map also allows for customization, accommodating client preferences for styles like cat-eye or wispy looks․
Ultimately, mapping demonstrates professionalism and a commitment to delivering a high-quality, personalized service․
Understanding Eye Shapes for Mapping
Lash mapping guides emphasize recognizing diverse eye shapes – round, almond, hooded, upturned, and downturned – to customize extension placement effectively․
Adapting the map to each unique eye form is vital for achieving a balanced and flattering lash enhancement․
Round Eye Mapping
Lash mapping guides for round eyes focus on creating the illusion of length and definition, as round eyes naturally lack a defined crease․ The goal is to avoid making the eyes appear even rounder․
Typically, a lash map for round eyes will feature longer lengths concentrated towards the outer corner, gradually decreasing in length as you move towards the inner corner․ This creates a subtle wing effect, adding a horizontal dimension․
Avoid applying the same length across the entire lash line, as this can accentuate the roundness․ Strategically placed longer lashes on the outer third will lift and elongate the eye shape․ Consider a ‘cat eye’ inspired map, but with a softer, more blended transition․ Using varied curl types can also enhance the effect, with a more curled lash towards the center and a straighter curl on the outer edges․
Almond Eye Mapping
Lash mapping guides for almond eyes emphasize enhancing their naturally beautiful shape․ Almond eyes are considered the most versatile, allowing for a wide range of lash styles․ The key is to work with the eye’s natural contours, not drastically alter them․
A classic almond eye lash map often features a balanced approach, with lengths gradually increasing towards the outer corner, but not as dramatically as with round eyes․ A subtle cat-eye effect is popular, but softer and more blended․
Maintaining a consistent curl throughout the lash line is generally recommended, as almond eyes already possess a natural lift․ Technicians can experiment with different lash thicknesses and textures to create customized looks, from natural to glamorous․ Mapping should follow the lower lash line’s natural angle, avoiding a ‘spidery’ or unnatural appearance․
Hooded Eye Mapping
Lash mapping guides for hooded eyes require a strategic approach to create the illusion of a more open and lifted eye․ The hood can obscure lashes, so careful placement is essential․ The goal is to avoid a ‘hidden lash’ effect where the extensions disappear behind the lid․
A common technique involves mapping shorter lengths in the inner and middle sections, gradually increasing towards the outer corner․ This creates lift and prevents the lashes from being weighed down by the hood․
Using a tighter curl (C or D curl) can also help lift the lashes and make them more visible․ Technicians should focus on mapping lashes higher in the lash line, closer to the eyelid crease, to ensure they are seen when the eye is open․ Avoiding extremely long extensions is crucial, as they can exacerbate the hooded appearance․
Upturned Eye Mapping
Lash mapping guides for upturned eyes aim to enhance the natural lift and create a wide-eyed, doll-like effect․ These eyes already have a natural upward slant, so the mapping should complement this feature rather than exaggerate it․
A popular technique involves mapping longer lengths towards the outer corner, gradually decreasing towards the inner corner․ This emphasizes the upward tilt and creates a more dramatic, open look․ Using a natural curl (B or C curl) is often preferred to maintain the eye’s natural shape․
Technicians should avoid mapping too many long lashes in the inner corner, as this can make the eyes appear overly wide or even startled․ A balanced approach, with a focus on lengthening and lifting the outer lashes, will deliver the most flattering result․ Mapping slightly higher in the outer corner can further accentuate the upturned shape․
Downturned Eye Mapping
Lash mapping guides for downturned eyes focus on creating a lifting effect, counteracting the natural droop and opening up the eyes․ The goal is to visually lift the outer corners, making them appear more awake and youthful․ This requires a strategic approach to lash length and curl․
Typically, longer lengths are mapped towards the outer third of the eye, with a gradual decrease in length as you move towards the inner corner․ A more pronounced curl (C or D curl) is often recommended to provide maximum lift․ Mapping lashes slightly higher in the outer corner further enhances the lifting illusion․
Avoid applying very long lashes to the inner corner, as this can drag the eye down further․ A focus on volume and lift in the outer area is key․ Careful consideration of the client’s natural lash line and eye shape is crucial for achieving a balanced and flattering result․
Popular Lash Mapping Styles
Lash mapping guides showcase diverse styles like cat eye, doll eye, and fox eye, each offering a unique aesthetic․ These maps dictate lash length and placement․
Wispy and hybrid maps blend textures for a natural, voluminous look, adapting to individual preferences and enhancing eye shapes beautifully․
Cat Eye Mapping
Cat eye mapping, as detailed in numerous lash mapping guides, is a popular style characterized by a gradual increase in lash length towards the outer corner of the eye․ This creates a lifted, elongated effect, mimicking the sleek shape of a cat’s eye․
Typically, the inner corner utilizes shorter lash lengths – often 12mm or 14mm – building progressively to longer lengths, such as 16mm or 18mm, at the outer corner․ The map isn’t a straight line; a subtle curve is essential for a natural-looking lift․
Effective cat eye mapping requires careful consideration of the client’s natural eye shape․ It’s particularly flattering on round or almond-shaped eyes, adding definition and a touch of drama․ Guides emphasize the importance of avoiding overly dramatic lengths if the client desires a more subtle enhancement․ Proper isolation and strategic placement are key to achieving a seamless, sophisticated cat eye look․
Doll Eye Mapping
Doll eye mapping, frequently illustrated in lash mapping guides, aims to create an open, youthful, and rounded eye appearance, reminiscent of a doll’s large, innocent eyes․ This style focuses on maximizing fullness and curl throughout the entire lash line, rather than emphasizing a specific lift or elongation․
The key to doll eye mapping is using consistent lash lengths across most of the eye, typically ranging from 12mm to 14mm, with a slight increase in length towards the outer third․ The inner corner often receives the shortest lengths to avoid a closed-off look․
Guides highlight the importance of evenly distributing the lashes and avoiding overly dramatic lengths․ This style is universally flattering, but particularly effective for clients with downturned or hooded eyes, as it helps to lift and open up the eye area․ Achieving a natural, yet noticeable, doll-like effect requires precision and attention to detail․
Fox Eye Mapping
Fox eye mapping, detailed in many lash mapping guides, is designed to create a lifted, elongated eye shape, mimicking the sleek, upward slant of a fox’s eyes․ This style is achieved by strategically placing longer lashes in the outer corner and gradually decreasing the length towards the inner corner․
Typically, fox eye maps utilize lengths ranging from 12mm in the inner corner to 16mm or even 18mm in the outer corner, creating a noticeable lift․ Guides emphasize the importance of a smooth transition between lengths to avoid a choppy appearance․
This technique is particularly popular for clients seeking a more sophisticated and lifted look․ It’s often favored by those with round or almond-shaped eyes, enhancing their natural features․ Mastering the fox eye map requires a keen eye for symmetry and a precise application technique for optimal results․
Wispy Lash Mapping
Wispy lash mapping, as detailed in numerous lash mapping guides, focuses on creating a textured, natural look with varying lash lengths and strategically placed spikes․ This style avoids a uniform, dense appearance, instead opting for a softer, more feathery effect․ Guides often recommend incorporating multiple lengths within each eye section․
Achieving a wispy set involves using a combination of classic and volume lashes, with varying curls and thicknesses․ Mapping typically includes shorter lengths in the inner and middle sections, gradually increasing towards the outer corner, but with intentional gaps and varied lengths to create the wispy texture․
This technique requires a skilled technician to ensure the spikes are balanced and natural-looking․ It’s a popular choice for clients desiring a subtle yet impactful enhancement, offering a softer alternative to bolder styles․
Hybrid Lash Mapping
Hybrid lash mapping, as outlined in many lash mapping guides, expertly blends the techniques of classic and volume lashing to deliver a textured, full, yet natural look․ This style offers the best of both worlds – definition from classic lashes and volume from volume fans․
Guides emphasize alternating between individual classic lashes and small-volume fans (typically 2-3D) throughout the lash line․ The mapping often involves using classic lashes in the inner corner for a softer effect, transitioning to a mix of classic and volume in the mid-section, and finishing with predominantly volume lashes towards the outer corner for added fullness․
Hybrid mapping allows for customization based on client preference, offering a versatile option suitable for various eye shapes and desired levels of drama․ It’s a popular choice for those seeking a balanced, textured lash enhancement․
Lash Mapping Techniques & Tools
Lash mapping guides detail essential tools like templates and specialized pencils for precise planning․ Mastering length selection and isolation is key for optimal results․
Effective techniques ensure balanced, beautiful lash extensions tailored to each client’s unique eye shape and desired aesthetic․
Choosing the Right Lash Lengths
Selecting appropriate lash lengths is fundamental to successful mapping, guided by natural lash health and client preference․ Lash mapping guides often recommend starting with lengths mirroring the natural lashes, typically ranging from 12mm to 16mm, and adjusting based on the desired effect․
Shorter lengths (12-14mm) are ideal for the inner corner, creating a softer, more natural look, while lengths gradually increase towards the outer corner (15-16mm) for a subtle lift․ A common mapping sequence, as seen in kits like Fadlash Beauty Kit, might be 12, 14, 14, 16, 16, 16mm․
Consider the client’s natural lash strength; avoid lengths that could cause strain or damage․ A skilled technician will assess the natural set and curl to determine the most flattering and safe lengths, ensuring a comfortable and long-lasting result․ Prioritizing lash health is paramount when choosing lengths․
Using a Lash Mapping Guide/Template
Lash mapping guides and templates are invaluable tools for visualizing and executing precise lash extension applications․ These guides, often provided within professional kits like the Fadlash Beauty Kit, offer pre-designed maps for popular styles – cat eye, doll eye, or fox eye – simplifying the planning process․
Templates typically feature an outline of the eye shape, allowing technicians to mark the desired length and curl for each section․ This ensures symmetry and a cohesive look․ Utilizing a guide minimizes errors and promotes consistency, especially for beginners․
Guides help determine the optimal placement for different lengths, ensuring a flattering and balanced result․ They also aid in communicating the desired style to the client, fostering collaboration and satisfaction․ Proper use of these tools is key to achieving professional-quality lash extensions․
Importance of Isolation
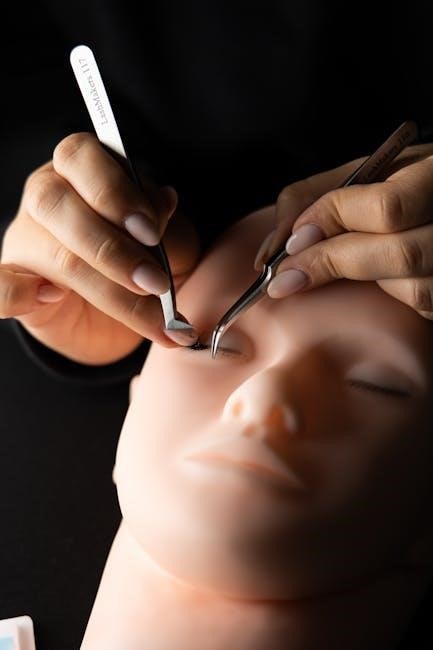
Precise lash isolation is paramount throughout the entire mapping and application process․ It ensures that each extension is bonded solely to a single natural lash, preventing stickies and maintaining healthy lash growth․ Without proper isolation, extensions can cause damage, discomfort, and premature shedding of natural lashes․
Effective isolation relies on utilizing tools like isolation tweezers to gently separate lashes, ensuring no accidental bonding occurs․ A well-executed lash map guides this process, highlighting areas requiring specific attention․ Consistent isolation is not merely a technique, but a commitment to client safety and long-lasting results․
Skipping or rushing isolation compromises the integrity of the entire service, potentially leading to client dissatisfaction and negative consequences for natural lash health․ It’s a foundational principle of professional lash artistry․
Step-by-Step Lash Mapping Process
A thorough process begins with client consultation, followed by mapping the inner, middle, and outer corners, ensuring a balanced and customized lash extension application․
Careful planning and execution are key to achieving the desired look and maintaining natural lash health throughout the entire procedure․
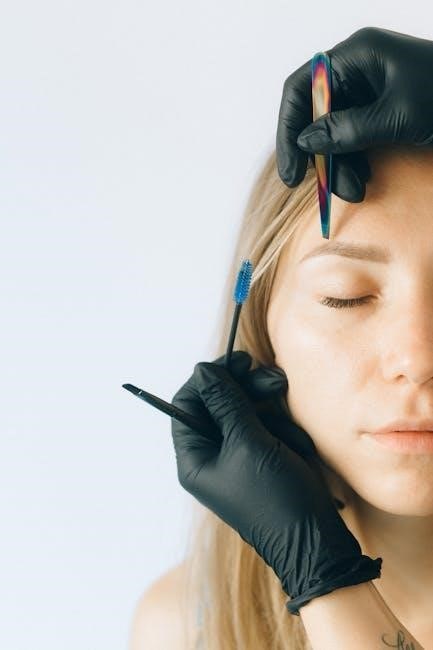
Preparation & Client Consultation
Before beginning any lash mapping process, meticulous preparation and a detailed client consultation are paramount․ This initial stage sets the foundation for a successful and satisfying experience for both the lash artist and the client․
Begin by thoroughly cleansing the client’s lashes to remove any makeup, oils, or debris․ This ensures optimal adhesion of the extensions․ Next, engage in a comprehensive consultation to understand the client’s desired look, lifestyle, and any sensitivities or allergies they may have․
Discuss various lash styles – cat eye, doll eye, fox eye, or wispy – and explain how each complements different eye shapes․ Assess the client’s natural lash health and growth patterns․ A detailed discussion about aftercare is also crucial, emphasizing the importance of gentle cleansing and avoiding oil-based products․
Finally, confirm client expectations and address any concerns before proceeding with the mapping process․ A well-informed client is a happy client!
Mapping the Inner Corner
The inner corner is often the most delicate area when it comes to lash mapping, requiring a nuanced approach to avoid overcrowding and ensure comfort․ Generally, shorter lash lengths are utilized here, typically ranging from 12mm to 14mm, to create a soft, natural look․
Avoid placing extensions directly onto the natural lashes closest to the inner corner, as these are often shorter and weaker․ Instead, focus on mapping slightly away from the waterline, allowing for a gradual increase in length as you move outwards․
Consider the client’s eye shape; for hooded eyes, a more conservative approach with even shorter lengths may be necessary to prevent poking․ For round eyes, slightly longer lengths can help elongate the eye shape․
Strategic placement in this area establishes the foundation for the overall lash design, contributing to a balanced and harmonious final result․
Mapping the Middle Section
The middle section of the lash line is where you begin to build the primary shape and density of the lash set․ This area typically utilizes a range of lengths, gradually increasing from the inner corner lengths – often 14mm to 16mm – to create a subtle lift and dimension․
Maintain consistent spacing and avoid clumping by carefully mapping each extension․ Consider the client’s desired style; for a natural look, focus on even distribution, while for a more dramatic effect, you can introduce slightly longer lengths and increased density․
Pay attention to the natural lash direction; follow its curve to ensure a comfortable and seamless blend․ This section is crucial for establishing the overall balance and shape of the lashes, so precision is key․
Proper mapping here ensures a flattering and long-lasting result․
Mapping the Outer Corner
The outer corner is where you define the final shape and create the desired effect – cat eye, fox eye, or a more rounded finish․ This area typically utilizes the longest lengths in the map, often ranging from 16mm to 18mm, or even longer for a dramatic look․
Gradually increase the length as you move outwards, creating a subtle or pronounced flick depending on the client’s preference․ Pay close attention to the angle of the extensions, ensuring they follow the natural upward curve of the eye․
Strategic placement is vital; avoid extensions that point downwards, as this can create a droopy appearance․ Focus on building a wispy or layered effect for a more natural and textured finish․
A well-mapped outer corner elevates the entire lash set, providing lift and definition․

Advanced Lash Mapping Considerations
Customization is key; adapt maps to each client’s unique eye shape and desired style․ Troubleshooting ensures optimal results, addressing issues like unevenness or sparse areas․
Continuous learning through available resources refines skills and expands mapping expertise for stunning, personalized lash extensions․
Customizing Maps for Individual Clients
Individual consultations are paramount when tailoring lash maps․ Every client presents with unique eye shapes, natural lash lines, and aesthetic desires․ A thorough assessment, considering factors like eye tilt, spacing, and density, forms the foundation for a personalized map․
Adaptability is crucial․ While pre-designed maps like cat-eye or doll-eye serve as excellent starting points, they should be modified to complement the client’s specific features․ For instance, a hooded eye might require a slightly adjusted map to avoid a closed-off appearance․
Communication is key․ Discussing preferences – desired length, curl, and overall style – ensures client satisfaction․ Don’t hesitate to offer suggestions based on your expertise, explaining how different maps will enhance their natural beauty․ Remember, a collaborative approach yields the best results, creating a bespoke lash look that perfectly suits each individual․
Consider natural lash health․ Mapping should prioritize the health and integrity of the client’s natural lashes, avoiding excessive weight or strain․
Troubleshooting Common Mapping Issues
Uneven lash distribution can often be rectified by re-evaluating the initial map and adjusting lash lengths accordingly․ Ensure symmetry by comparing both eyes meticulously during the mapping process and throughout application․
Spiking or unnatural looks frequently stem from inconsistent curl choices or overly dramatic length increases․ Opt for gradual transitions and consider mixing curls to create a softer, more blended effect․ Avoid abrupt changes in length or curl․
Lashes lifting or twisting may indicate improper isolation or insufficient adhesive․ Double-check isolation techniques and ensure the adhesive is applied correctly, avoiding overloading the natural lash․
Client discomfort could signal a map that’s too heavy or placing lashes too close to the waterline․ Prioritize client comfort and adjust the map to alleviate pressure․ Always prioritize the health and wellbeing of the natural lashes․
Resources for Further Learning
Fadlash Beauty Kit offers comprehensive resources, including detailed mapping guides and individual lash packs, facilitating practice and skill development․ Their kits provide a solid foundation for mastering various mapping techniques․
Study․com presents flexible online courses covering beauty and wellness topics, potentially including lash extension modules․ These courses can offer a structured learning path and transferable college credit․
Numerous online tutorials and workshops are available on platforms like YouTube and Skillshare, demonstrating advanced mapping styles like cat eye and fox eye․ These resources provide visual learning opportunities․
Professional lash extension training academies offer in-depth courses covering all aspects of lash application, including advanced mapping techniques․ Investing in formal training ensures a high level of expertise and safety․
Stay updated with industry trends through beauty blogs and social media for inspiration and new techniques․